

My name is Luis Arraiz, I am a frame design engineer and specialize in bicycle vehicle dynamics, kinematics and geometry design. I was the founder of K9 Industries Ltd in 2005 in the UK. I worked at CSG (now Pon) from 2015-2023 where I was responsible for the geometry, kinematics and packaging for all the full suspension bikes both analogue and e-bikes for both Cannondale and GT bikes and also several GT hardtails. I introduced the concept of size specific geometry and kinematics for Cannondale dubbed “Proportional Response”. I am now back to the UK, where I am a senior Lecturer in Vehicle Dynamics at Oxford Brookes University. I am also a consultant in bicycle, kinematics & components design and analysis as well as provide data logging services.
I have been designing and data logging MTB’s since 2005, and I have decided to share some interesting aspects of bicycle design, kinematic analysis, suspension theory, suspension setup air springs, data logging and others as a series of case studies.
This is the first case study on a series in which I will be discussing.
Case Study: Jekyll DH
The weekend of April 5th-6th I visited and finally got to see Matt Dewey, he’s a good friend and was a colleague when I was working for CSG (now Pon). Matt was going to race at the first round of the National Downhill Series at Cwmcarn and I offered to help him set up the jekyll for the race using the Motion Instruments data logging system.

The bike is a large 2033 Cannondale Jekyll which I know quite well. It is setup as a dedicated DH bike and it has been fitted with a Mx link from Cascade (a collaboration from Cannondale & Cascade), a 2025 Rockshox Boxxer set to 190 mm, Rockshox Vivid air shock, SRAM DH cassette 11-25t, 29er rear wheel, Continental Kryptotal supersoft DH casing tires.
Prep Work
Before I could get started I had to create kinematic models of the bike on CAD and on Linkage to allow assessment of the changes in bike’s geometry, kinematics due to the changes in wheel size, MX link and the longer fork. I also used these models to create the appropriate data logging profile and to design 3D printed mounts for the linear potentiometer.

Geometry
The geometry is well suited to the task intended. It’s a great setup for UK downhill, this configuration with the MX link, 29er rear wheel and 190 mm fork amounts to 171 mm of rear wheel travel which matches the front 190 fork very well which has vertical travel of approximately 172 mm.

Kinematic Analysis
The kinematics are still very close to the original Jekyll in both the general 29er as well as the Mx (Mullet) configuration used by the CFR team.
The main kinematic changes are the following:
The Motion Ratio between 30-90% of the travel increases from 12.4% to 15.4%, its gradient gets more linear at the beginning of the travel which improves its small bump sensitivity.
The Anti-Rise at sag increases from 60.9% to 65.5%, which helps keep the geometry under hard braking while still being fairly active in the braking bumps.
Anti-Squat sees a slight decrease overall, but the major difference is due to the smaller downhill cassette.


Motion Ratio
I plotted the Motion Ratio, which also was used to create the math channel and profile for use with Motion Instruments’ data logger. This allows me to look at the behavior of the rear suspension at the wheel, not at the shock. My aim is to balance the suspension at the wheels, why? because that is simply what the rider feels.

Dynamic Analysis
Before I test any vehicle, I like to run a quick dynamic analysis to get a baseline understanding on how the suspension should work. This task often involves a bit of coding or when pressed for time I default to spreadsheets. This involves looking at the rider & bike weights, unsprung weights, suspension displacements, head angle, shock stroke, etc… I do this to determine a good theoretical setup for the bike and rider, the emphasis here is to obtain a good baseline to work with.
This tool can yield good results. I want to point out that the table is for illustration purposes only as it assumes a constant motion ratio (leverage ratio) and it does not factor in the progression of the suspension. Also, it is based on ideal coil springs instead of air springs. Another thing worth paying attention to is that there are 2 rear wheel rates plotted. The linear rate, which assumes a perfectly constant motion ratio (dash dark red line) and the actual ratio which is progressive (solid bright red line).
By doing some quick changes in both sag and weight distribution on the calculator, it can provide sensible data as to how the suspension may behave based on these changes.

Key Points for a Balanced Setup
The procedure I follow when setting up a bike and analyzing data is the following:
First, look at the sag
Second, balance the rebounds
Third, fork then rear
Fourth, trust the process. Sometimes it will get worse before it gets better
The reason that sag is so important is that sag is directly linked to the wheel rates (the effective spring rates at the wheels). These not only determine how much the suspension compresses under the bike and rider weights but also they determine the dynamic geometry of the bike, and more importantly the wheel rates and the combined sprung mass of the bike plus rider define the suspension natural frequencies.
I do not want to get into too much detail on natural frequencies in this instance, as it will be covered more in-depth in the future. The natural frequencies define how quickly the suspension will move with the terrain and how it responds to rider inputs. Stiffer springs result in higher frequencies, thus faster response. When these are too high then more force will be transmitted to the rider. If the wheel rates are too soft, then the suspension will be too soft and it will not respond to rider inputs and will not recover well. Also soft springs don't tend to jump very well either.
From my experience, rebound is the second most important parameter for a balanced suspension performance. As the rebound controls the speed that the wheels return to the ground, this is really important over rough terrain. Rebound is also tasked with providing grip by keeping the tires’ contact patch on the ground.
Fork first I say, but why? Simple, it is the first element in contact (front tire actually) that interacts with the ground, bumps, roots, jumps, etc… The front end has a huge effect on the bike’s handling, dynamic geometry and overall control.
Rider Aspects
The two other key aspects I encourage the test riders to stick to are the following:
Ride the same trail
Ride at the same pace and effort, hitting the same lines, braking points, etc…
These 2 aspects help to maintain consistency through the test, it helps to compare and analyze the data. However, if the time and speed change is due to the bike’s setup and the rider’s effort. This may sound extremely boring but it will provide the best results in the long run.
Testing
Matt mentioned that the bike struggled carrying speed on flats, that it would kick on the jump lips and that it was hard to jump. The rear suspension had a tendency to get held up on the rougher sections of the trail, which is not really ideal for downhill.
For the actual testing we headed over to Bike Park Wales, as it provides a great variety of downhill oriented trails with the added advantage of a very good uplift system.
The data logging test was performed on 2 tracks, one at the top section and a second bottom section.ACDC was selected at the top section which features a lot of rough and technical terrain. For the lower section Pork Belly was used as it was a faster trail with more jumps and one which carrying speed was required.
Below are the trail descriptions for both trails when prompting AI.
The ACDC trail at BikePark Wales is described as a blend trail, offering a mix of flowy berms and technical sections, including roots, rocks, and jumps, making it suitable for intermediate to advanced riders. It's a slightly longer trail, around 1.5 to 2 minutes in length, and requires riders to be comfortable with jumps and technical terrain, according to a video description.
The Pork Belly trail at BikePark Wales is a Black-graded, flow-focused mountain bike trail that offers a mix of speed, jumps, and rocky sections. It's known for its fast-paced, bermy sections and a direct route to the underpass.
By logging each track independently we were able to compare the bike’s performance independently across 2 different trail conditions. This actually proved to be quite beneficial as it allowed us to see which changes were trail specific and which ones carried over to both trails.
The first 2 runs were aimed to familiarize with the track and the conditions, the data was recorded and analyzed on a separate tool which helps me compare the suspension performance of the bike.
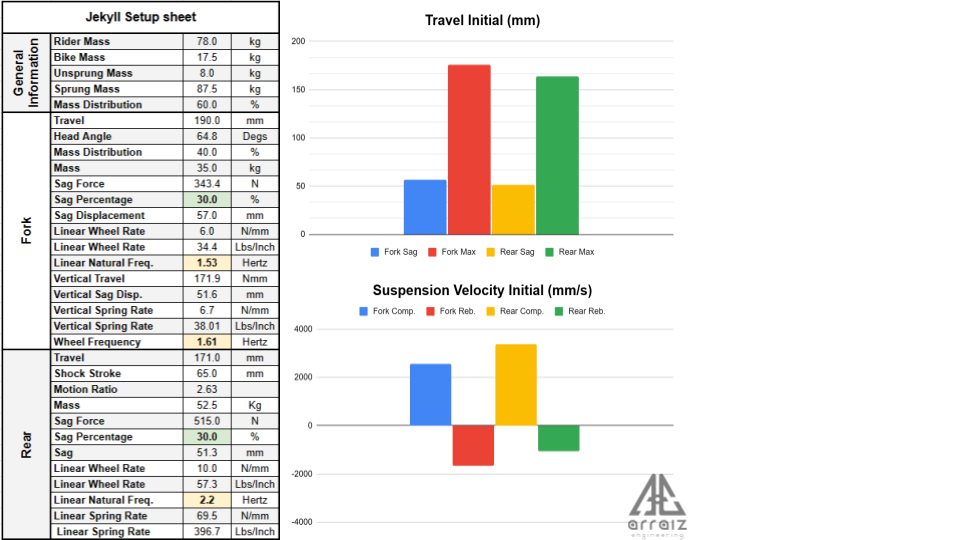
Initial Setup
Looking at the data for the initial setup it was possible to see that both suspensions were undersprung, they were just far too soft, especially the fork. But what was more noticeable was that the rear rebound was extremely overdamped and slow, the balance between both front and rear rebound was quite off.
Sag
Front sag was measured at 57 mm (30%) instead of the desired 20%, which loads the front end too much, then the rider is forced to move back to compensate and maintain a more balanced center of gravity. The rear sag was also a little high but not too far.
Max Displacement
The fork was using too much of its travel at 175 mm (92.6%), mainly due to low wheel rate, and the rear was using a lot of the travel at 164 mm (59.6%).
Rebound
Motion instruments’ app has an incredible tool, which provides the 95th percentile values for compression and rebound. This is a great tool, as it is not advisable to set up a bike based on maximum velocities, as these are highly inconsistent and vary greatly based on the bike’s speeds, different lines, different rider inputs. However the 95th percentile is a lot more repeatable, and that’s what is needed when testing and comparing data.
The fork rebound’s speed was fair for the spring rate at a speed of -1,649 mm/s, from my experience this is a fairly decent value.
Now the rear rebound was a completely different story. It was way off from what I would consider an acceptable value. Remember Matt's feedback that the rear end would buck on the jump lips, so naturally we could assume that the rebound was too fast, correct? Well, we would be completely wrong!!!! What, that’s nonsense, Luis. The data does not lie, people do and often to themselves, this time the data was saying that rear rebound speed was -1,050 mm/s. This was the culprit, the rear end was so slow that it was packing down, on jumps it had so little travel available that it was bottoming which was causing the bucking effect.
Compression
The fork’s compression was a bit on the slow end at a speed of 2,570 mm/s, especially the low speed, which is understandable as with a very soft spring it had a tendency to dive quite a lot under braking, so the low speed compression is increased to control the brake dive.
The rear rebound was the opposite, it was quite fast at a speed of 3,388 mm/s. This is starting to make more sense, such fast compression velocities suggest that there is really no support from the damper when the rider pushes down and pumps, it just blows thru the travel.
So Luis, you mean to believe that you got all of that just from the numbers of an iphone? Mostly but not quite, all of these theories for the initial setup were also validated using the line graphs.
Here is an event on ACDC, in which the bike is coming off a jump or drop and landing into some rough section.

Air Time
During this event, coming off the jump, the rear rebound is much slower than the fork’s rebound. Another interesting point here is that at the end of the extension, the rear rebound takes a lot longer to reach full extension, which is likely caused by the hydraulic topout feature of the Vivid rear shocks.
Landing
As the wheels touch the ground, they both compress to similar displacements. However, the velocities are quite different, and that is visible through the slopes of the lines. The blue fork line has a shallow slope, while the orange rear line has a steeper slope. Which indicates it is faster than the front.
Recovery
In this phase, both suspensions return to their respective equilibrium positions. Again, by analysing the respective slopes for the fork and rear lines, it is possible to see that the orange rear line has much flatter behavior when compared to the blue fork line which exhibits more vertical behaviour, indicating that the rear rebound is slower than the fork’s rebound.
Front
Now let’s take a look at the fork’s compression and rebound. The compression and rebound phases are fairly symmetrical which indicates that the speeds are similar.Ideally the compression should be slightly faster than the rebound but it’s fairly balanced which is a good thing. This is to be tackled later as it is in the realm of fine tuning and there are other priorities that need to be addressed beforehand.
Rear
Following the same analysis for the rear, it is obvious that the compression is quite fast and that the rebound is slower by a large margin. The slow rebound is now one of the top priorities as well as the soft wheel rates.
I would also like to mention that I use other tools both within the Motio instruments’ app as well as an excel program where the data is input, and it does a much better job of visualizing and quantifying the bike’s overall balance.
Initial Setup Changes
Changes
I decided to increase both the fork’s and rear air pressures with the aim to reduce the sag closer to the ideal sag values for the fork at 20% and the rear around 27.5%.
The rear rebound bound was opened a couple clicks to restore the balance between both rebound velocities.
This a condensed version of the remaining changes and feedback from the rider
Rider Feedback
ACDC: 16 carrying a bit more speed. Still bucking a bit, getting bug down
Pork Belly: carried a bit more speed, more confidence in corners, felt more balanced. Thrown up in jumps.
Changes
rear close LSC 2 clicks
open HSC 2 clicks
Run 2:
Rider Feedback
ACDC: 16 carrying a bit more speed. Still bucking a bit, getting bug down
Pork Belly: carried a bit more speed, more confidence in corners, felt more balanced. Thrown up in jumps.
Changes
rear close LSC 2 clicks
open HSC 2 clicks
Run 3
Rider Feedback
ACDC: more supportive, carried speed better, more balanced
Pork Belly: more supportive, carried speed better, more balanced
Changes
Increased fork pressure front 10 psi to 180 psi.
Rear went up in pressure to 255 psi
Opened fork low speed compression to 3 from open
Run 4
Rider Feedback
ACDC: Carried speed very well, but the front felt a bit skittish.
Pork Belly: Back felt a bit firm and solid in bumps on the slower sections
Changes
Slowed down rebound front to 10 clicks
Sped up rear rebound 3 clicks
Run 5 (due to time constraints, from this point on the pause between both tracks was removed and the data for both tracks were combined)
Rider Feedback
ACDC & Pork Belly: felt more controlled, more composed, it had more front end grip and it slowed the track down.bit firm and solid in bumps on the slower sections
Changes
Fork slowed rebound by 2 click
Rear open HSC to fully open
Run 6
Rider Feedback
ACDC & Pork Belly: Carried more speed, good support, it flowed more in the rough slow sections, carried good speed on corners. Carried speed well on the flats, more of a platform. It felt like I could pedal anywhere. Predictable on jumps and landings.
Changes
None
Final Setup
The data for the final setup looks a little different when compared to the initial setup. The suspension appears to have better balance from sag, travel used, compression and rebound velocities.

Sag
Front sag has been reduced from 57 mm (30%) to 39 mm ( 20.5%). At this sag value the front end stays higher in the travel and the rider in a more upright and neutral position. As for the rear, the reduction in sag was minor from 30% to 28.1%, even though the air springs and wheel rates were increased considerably. This is very likely related to the weight distribution, with the more central rider position, there is now more weight and force on the rear suspension.
Max Displacement
The fork’s maximum travel was reduced from 176 mm (92.6%) to 159 mm (83.7%), this is desirable there are no features on the track which should warrant the use of all the fork travel. The rear maximum displacement was marginally reduced from 164 mm (95.6%) to 162.9 mm (95.3%). This is the combined result of the increased in the bike’s speed, hitting the terrain both faster and harder. The maximum displacement could be further reduced with the use of volume spacers but there was neither the time nor the ability to remove the rear shock due to seized linkage hardware.
Rebound
The rebound speeds between the fork and the rear were more closely balanced with the fork’s speed of -1,649 mm/s and a rebou’s speed of -1,261 mm/s.
The fork rebound provides a good setup as proved to be a better setup as it provides quick recovery without feeling skytish, plenty of grip and feeling of calmness and the sensation that the track has slowed down.
The rear rebound is a much better setup, it does not buck on jumps, it provides plenty of grip and it is a lot more active. Is it ideal, not quite. The rebound was close to full open and we were struggling to reach the adjuster. There is still room for improvement. Overall both rebound speeds provide a much better overall balance.
Compression
The fork compression velocity was faster as it increased from 2,570 mm/s to 2785 mm/s. This was expected with the increase in air pressure providing a stiffer spring rate and the reduction of low speed compression as well. It provides good support under braking and through the overall travel without being harsh on the rider’s hands.
The rear’s low speed compression was increased for several reasons, first to provide support for pumping but it also improves the support for pedaling, cornering, as well as on jumps. The increased low speed compression offsets the force at which the high speed damping begins, and increases the damping across all the speeds. This increased the feedback in the rougher sections, to alleviate this the high speed compression was opened completely to allow the wheel to move more freely over fast and repeated bumps.
The suspension traces on the line graph confirms the results from the tabulated analysis.

Air Time
While the wheels are off the ground they both extend to top out at similar speeds, as the slopes downward slopes are fairly parallel to each other.
Landing
Upon landing again, both compression velocities exhibit a more parallel behavior, but now the rear compression is slower than the fork, which is what was desired to provide more support for rider inputs.
Recovery
During the recovery phase, both wheels extend at very similar speeds, but the rear can be seen to have a less vertical slope which means it is slightly slower than the fork’s rebound. This is much better than from the initial setup, in which the difference was quite pronounced. For this setup the rebound speeds display a better balance.
Front
When comparing the compression and rebound velocities for the fork, it is possible to see how they behave more uniformly. The overall shape is good, as both the compression and rebound lines are angled into a triangulated shape, with the rebound being having a larger angle from vertical, which indicates its speed is slower. This is exactly the expected shape.
Rear
The rear also closely resembles a similar shape to fork, but with a flatter, slower rebound speed. It is not ideal, but it is considerable when compared to the initial setup.
Testimonial
Here is what Matt had to say about the setup:
Turning my Jekyll into a DH rig with 190 fork i was struggling to get comfortable. Using the MX link helped with the geo but working with Luis made the balance of the whole bike feel amazing. Cornering and carrying speed is another level. Especially with that much travel.
You could see how I get in on the weekend. If I get on the podium it’s 100% down to the changes.
When I pressed to see when we could fine tune it even more so, this is what Matt had to say:
Like before, I think I need to ride it like this for a while and get up to that speed. I think the bike is so fast I need to work with it before going faster again. Hahaha!
And he made a great point, we currently found a good baseline setup. He does need to get used to the bike, learn it well and explore the limits of its capabilities, pushing it to the edge of control. Then and only then will it be worth extraction more performance from the bike
Race Results
Back to the race, this was the catalyst for the testing and data logging. Matt raced his Jekyll at the first round of the UK National downhill series at Cwmcarn the weekend of 12-13th of April 2025. He qualified in 4th place and got on the podium with another 4th place in the Masters 30+ category with a pretty stack field. Congratulations Matt!

Additional Notes & Recommendations
The data showed that the final setup was substantially better from the original. This was further confirmed by the rider. His comments included that the bike’s ability to carry and generate speed on flats and thru pumping was improved. The support in corners and in pumping was also enhanced. The bike’s ability to jump and was were also improved, as well as the pedalling efficiency. That the bike ability to generate grip was improved, that it felt more predictable and that the track felt like it was slowed down.
Overall I was very pleased with the much improved setup. A balanced setup is not just about going faster, it is about riding a bike that is more predictable, more forgiving and more confident and inspiring. At the end of the day, it is all so that the rider can forget about the bike and just go and ride and concentrate on his lines and not on what the bike is doing. When the rider forgets about the bike, it becomes part of him/her, synergy is reached and it's a beautiful thing.
However there is still room for improvement, some of the parameters that could be improved are the following, with highest priority being the top and lowest at the bottom:
Lowering the rear rebound damping (faster), perhaps a different rebound tune
Increasing the rear air spring progression with tokens
Increasing the fork air spring progression with tokens
So why would I want to increase the rear air spring progression? Simply to increase the bottom out force and reduce the maximum travel use of the rear suspension during normal riding.
According to Rockshox the Vivid has a very linear air spring curve, which if so it is fantastic. The graph below is a representation of the Vivid’s air spring.

I have no reason to doubt their claim as for over the past 6 months I have been on a setup program which can accurately model and plot air springs. When I was visiting Matt, I was able to take his Boxxer and a Zeb forks apart and measure their respective air springs. The week following the test, I was able to model both of these two forks. I believe the models represent the air springs quite accurately as the Boxxer’s final air pressure and spring stiffness accurately matched the sag force & displacement.
The graph clearly shows how the air spring, the theoretical ideal coil, both intersect the sag force and sag displacement lines at the same point. The air spring calculator was modeled at 180 Psi which is the same pressure from the final setup. Hey Luis, you said that the fork has 190 mm of travel, why does the graph displacement is closer to 170 mm? Simple, it's the vertical travel of the fork due to the head angle. What really surprised me about the air spring curve is how linear it is for the first half of the travel. It's quite remarkable. Adding an extra volume spacer may indeed improve its capabilities for this Jekyll.

Below is the graph for the Zeb’s air spring which I also rode on a Cannondale Moterra SL. which is a pretty sweet bike to ride at Bike Park Wales. This graph shows a more comun air spring curve for a fork. It’s not bad at all, in fact it’s pretty good but it is far less linear than the Boxxer’s air spring curve.

Next Steps for the Jekyll
So what do all these air springs curves have to do with the Rockshox Vivid and Jekyll’s Motion Ratio and setup? These are a few of the first steps, the next one will be measuring the internal air spring on the Rockshox Vivid, then input the resulting air spring model into the setup program and compare both wheel rates resulting from the fork and shock air springs. As the image below suggests, for this graph the air spring curve is modeled on a Fox Float X (more progressive) and not the Vivid.

Until Next Time
If you enjoyed this case study, and would like to see more of them, please comment, share or contact me. Some of the topics that will likely be covered as case studies include: sag, wheel rates and air springs, the 2025 Boxxer air spring, Specialized genie air spring, Fox 40’s, 38 & 36 air springs, other bikes that have been data logged.
If you have any suggestions for bikes, fork air springs, shock air springs, or if you would like to have an engineered setup on bike thru data logging, do reach out and contact me dia DM or email.
Really cool stuff, Luis!
Love that you’re dialing things in based on wheel rates, makes total sense. It's fun to think how much more people can get out of a bike with setup and not changing out a single part. The number of times we’ve found out someone’s just on the wrong shock tune or turns their compression knob the wrong way is an eye opener for some easy wins as well😅
For some background, Luis and I worked very closely together on a lot of projects. He has a ton of experience and is a kinematics guru. Some great learnings from this one, thank you Luis and great case study 👊
Hi Luis,
I just started reading during coffee break and will have to finish later!
What I read so far was super interesting, and I could relate to the feeling Matt startet with and the changes you made. Been down the same route...
Keep it coming!
Chris
Awesome in depth work right there!
Very intetesting post and cool work!
A few things I noticed:
I do not know these trails and how fast the rider is, but the velocities seem quite low to me in both compression and rebound. When setting up my DH racebike I always saw much higher numbers. Also do you mean static sag or dynamic sag in the post? For dynamic sag the numbers would seem quite stiff actually.
That is a great but of info and thanks for sharing. Plenty to dig into for the home tuner.
What data system do you use?
What comp, reb and dynamic sag is your target range?
I used a BYB system when I used to test with data from 2021 to 2023.
I always enjoyed about 30% dynamic sag rear, and somewhere between 25% and 30% front. I felt it worked well very balanced, but when for example you are tired in a race run and you start overbraking a bit or make a mistake it's nice to have a slightly stiffer front. I always used more than 85% of travel, most of the time had 5-10mm or so left when going pretty quick.
If I remember correctly max. reb velocities were pretty much always over 2200mm/s front and rear, I think closer to 2500mm/s. Max compression velocities regularly went to over 7000mm/s I think. I don't remember any averages, so take this info with a grain of salt......haven't used data in a while because I only borrowed it.
So one thing to note about HP bikes (from Steve at Vorsprung when I chatted with him) is that the nature of HP bikes with their reward axle path means that axle velocities tend to be slower. I know a lot of people with HP bikes run fairly light compression tunes because of it (though, ironically, the Telum runs a bit stiffer HSC with a smaller LSC range so that you can actually get damping from the HSC circuit).
Speculative thoughts ahead from my own opinion, do not take as fact: The LSC adjustor tends to have a much more drastic affect on HP bikes, which is why he was taking out HSC and adding in LSC to get more support.
Very interesting, and makes me annoyed all over again that Motion Instruments got shut down and System 2 canceled. I set up a couple of my bikes with a friend's System 1, but that was very difficult to mount on certain frames (i.e. Santa Cruz with shock tunnels). Still, I learned a lot from those tuning processes, and taught myself to use a similar diagnostic path as you outlined (just without data now): get the sag/pressure/spring rates right first, then sort out rebounds & balance them, then use compression to further balance.
Amazing work Luis! I was always super stoked to work with you at Motion Instruments. Happy to see you have a system still giving you the data you need. Too bad System2 never saw daylight. After all of the R&D we put into it, getting it through to manufacturing and ready to ship, to have the rug pulled at the finish line was disappointing to many customers. Keep up the great work. This was an incredible story to read.
This is amazing! Please keep them coming. I really like the set-up heuristic's. It's a great framework to approach a new bike setup from.
When you guys mention dynamic sag, is that the average or mean travel value over a run?
Dynamic sag is the average sag during the run. Thats depending on steepness of trail and grip in the dirt, this can change a lot. It's one of the most helpful metrics on the data to get a balanced bike.
In my experience I found different speeds from different systems. Personally I take Motion Instruments, BYB and SynBike numbers on their own and don't really compare, Ive never had 2 systems on at the same time, but my Motion Instruments kit and Syn bike and very different averages in speeds.
I agree that more dynamic sag offers more grip but depending on the steepness of the trail sometimes 20% front and 30% rear could be the move. Sometimes 25/28% could work also. I think bike, rider and trail need to be accounted for.
this is great information, thanks for posting it all in such detail man!!
As a Jekyll owner myself, I really appreciate it BUT also as a jekyll owner, I'd really love to see some more pics of this bike and the final setup. So rarely do people have it setup as a DH bike and I'm considering doing it myself.
I'd love to get an idea of what it would look like as a finished product to get some inspiration. Thanks again man!
Remember these are 95th centile speeds, not absolute maximum
very interesting!! thanks!!
Thanks Ryan, I miss working with you and trying to chase you sown the hill. I needed all the help I could get with the set up just to keep you on my sight, lol.
you are right, and most often than not it is very common to be on the wrong wheel rate and with the rebound wound too slow.
Ni Nico, the speeds are based on the 95th percentile not maximum velocities. The reason I prefer to use 95th percentile is that maximum velocities can vary greatly depending on bike speed, rider inputs, slightly different line choices. Different suspension displacements will also have an effect on the maximum suspension velocities as well as the tracks or trails. Each bike will be slightly different. This was just an example.
hi Nico,
Thanks for sharing your feedback. The maximum velocities for rebound were around 2700 for the fork and about 1900 for the rear. However, as stated earlier I do not care too much for them when setting up a bike. Sag, is a different story which i will go into a lot more in-depth on a later case study. However I designed the Jekyll for optimal performance between 25-27.5% sag at the rear. within these values is the sweet spot for bump absorption, pedaling & braking performance. Your bike might be completely different.
Hi, I am glad you took something from this piece, especially the procedure. it should definitely help to dial in a bike with an without data.
Hi Astrizzle,
I ma glad you enjoyed the article and I hope you enjoy your Jekyll, The Jekyll is one of my favorite bikes. unfortunately I do not have too many pictures of this bike as it belongs to my friend. However, if you would like to convert your bike into a DH or park sled, you should follow a similar approach to this one. It works well.
Hi Rob,
I am glad you enjoyed this case study. As you know i have always been a big fan of the Motion instrument data logger from the day I tried the beta version. I was truly looking forward to getting my hands on the System2 but what happened was a sad day for MTB. I know how much work and time you put into the R&D, and I am disheartened to see it go away, just like that.
Hi DServy,
Yes that is a very good observation. High Pivots bikes do tend to have lower vertical velocities as a result of the rearward axle path. That can be quite significant with very rearward axle paths such on the Commencal Supreme V4. The Jekyll is more of what could be called a "High Mid Pivot" design. it does have a lot of benefits of the HP while minimizing some of its drawbacks.
As a rule of thumb, with this type of design I do tend to run a lot more Low Speed Compression with minimal High Speed Compression damping.
Hey Luis, does the same thing go for rebound on high pivot? Less damping is needed for HSR?
Yes It’s the same for the rebound. It will end up a bit faster too. It will vary based on the bike too.
Nice work! It's awesome to see the whole process laid out like this - its not always (or ever) as simple as bolting sensors on and getting a result straight away so its great for people to see whats involved
@robprzy it was such a bummer to see the rug pulled on that one - I really thought you guys were close to the perfect consumer system and I hope something similar will see the light of day eventually!
Yeah its a good idea to use the 95% value if anything - peak speeds can easily be skewed by a single sensor dropout (meaning the readings go from positive to zero then back again in the space of 1 sample, and also higher sample rates will lead to larger spikes) or a less than rigid mount (very common) so without a ton of extra work you can't always be totally confident in their accuracy.
Some systems will automatically drop the invalid data points, I don't know for sure but it seemed like MIQ was able to mostly clean up the readings from some of my dodgy bent sensors without changing the overall data which was nice. There can be a few different methods of deriving velocity as well, and each will give slightly different values.
Whichever you use, its best to track the changes over a single session instead of comparing to values from different days, bikes or systems as there are too many factors that can shift the numbers you see for it to be reliable
Yeah I kind of see the data systems as I do pressure gauges or shock pump, I have mine for tire and suspension. I use those because if they are right or wrong, I go off those numbers.
Totally agree on the sensor movement and stuff also, there's definitely variability!
TheSuspensionLabNZ very well said, its not just about obtaining the magical setup by using the data system, its the whole process and also depends what the outcome or goals are. two riders of similar weight and different abilities may end up with somewhat different setups based on other external factors.
I also agree with you that the system2 from MI would have been close to perfection, especially with the rotary potentiometer at the link vs a linear potentiometer.
Post a reply to: Case Study: Jekyll DH Data Logging Setup